At first glance, it’s easy to think that if you have Data Loss Prevention (DLP) capabilities where you have policies monitoring internal data flows, then Information Barriers might be an unnecessary extra. After all, DLP diligently scans every email, document, and chat for sensitive content. This is certainly the sentiment that I often get when talking to Cyber Security teams.
This made me realise 2 things:
- Microsoft needs to do a better job in marketing/ promoting Purview Information Barriers and
- Information Barrier has it’s own purpose that DLP cannot do.
What is Purview Information Barrier
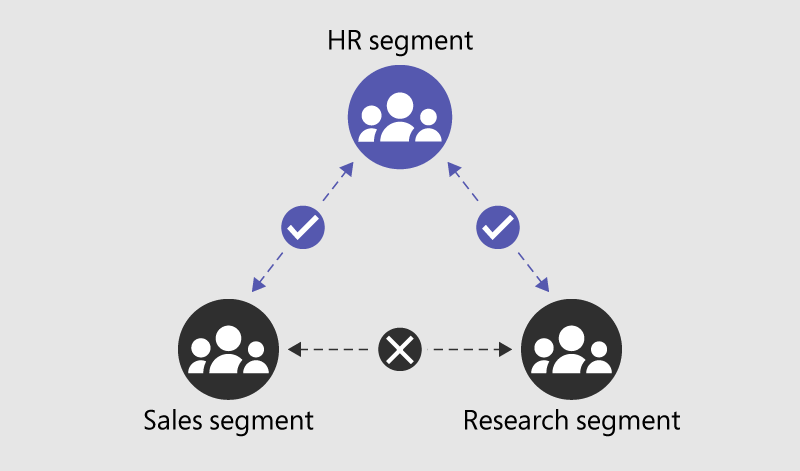
Microsoft Purview Information Barrier is designed to restrict communication and collaboration between defined groups within an organisation. It’s primary function is to ensure that teams with conflicting interests (think of trading and research groups in financial services) cannot interact with each other. By enforcing internal boundaries, these policies help maintain confidentiality and avoid accidental data leakage between sensitive departments. (ex. Insider Trading)
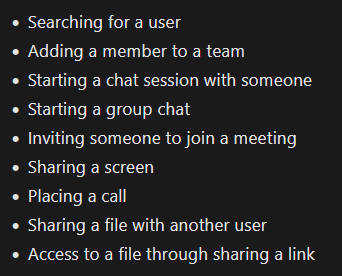
With Purview Information Barrier, you can create a policies that can automatically prevent internal teams from communicating with each other through Microsoft teams. These include the following actions:
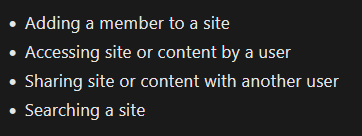
In SharePoint and OneDrive, Information Barriers can prevent the following unauthorized collaboration:
Capabilities shared by Information Barrier in Microsoft Purview DLP
You probably noticed that the activities above such as “Sharing a file with another” and “Sharing content with another user” can already be done within Microsoft Purview DLP. In essence, yes, that is correct. An admin can setup a policy to BLOCK these file sharing to another user.
Where DLP falls short and Information Barriers shine
While Purview DLP is effective at blocking explicit sending or sharing actions, it misses scenarios where access is already granted, which is where Purview Information Barriers come in to the rescue. DLP policies activate when a user actively sends data, but if sensitive information is already shared through granted permissions, the DLP policy remains dormant. For example, if User A (Finance) adds User B (Sales) as a member to the Finance Teams site or SharePoint site, User B gains immediate access to all files without any explicit sharing event, leaving DLP unable to intervene.
Alternatively, User A could simply send a meeting invite and start a Teams call with screen sharing, bypassing the trigger for DLP.
Another example, consider a situation where User A uploads a confidential document to a shared folder that automatically grants access to a broader group—here, Information Barriers would prevent unauthorised viewing by restricting access at the source, whereas DLP would not block the document being placed in that shared location.
Strategy in using BOTH Information Barrier and DLP
You should view Purview Information Barriers as a key part of your data governance and protection strategy. Relying solely on DLP leaves gaps that Information Barriers can fill—by preventing risky internal interactions before they even happen. Here’s a few actionable items that you can do today:
- Start by reviewing your organisation’s internal communication flows to identify potential conflicts of interest and assign segmented rules that restrict who can communicate with whom.
- Work with your Corporate Communications, Human Resources teams and Legal team to identify when and where to apply restrictions between groups of users.
- Ensure these barriers align with your overall compliance and governance framework, and conduct regular testing to confirm their effectiveness. Then codify these in your data governance policies
- Finally, train your teams on why these measures are necessary and how to adhere to them.
Adopting a dual strategy with both DLP and Information Barriers will provide much stronger data protection stance, reducing the chance of inadvertent data leaks from within.
References:
- Information Barriers: https://learn.microsoft.com/en-us/purview/information-barriers-solution-overview
- Get started with Information Barriers: https://learn.microsoft.com/en-us/purview/information-barriers-policies?tabs=microsoft-purview-portal
- Use Microsoft 365 Information Barriers to stay secure & compliant in your Microsoft Teams workplace: https://www.youtube.com/watch?v=39HDyKVZTSA